Timing
Belt, Seals and Tensioner Preventive Maintenance in B23/B230 Series.
[From RPR: illustration copyright and
used by permission]
Four-cylinder engines 1976 and later al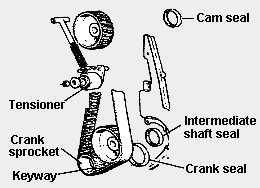 l
drive the camshaft(s) and intermediate shaft with a toothed timing belt.
This part is replaced during normal maintenance every 45,000 or 50,000
miles, depending on your year and model. See the owner's manual.
It is highly advisable to change the seals on cam, intermediate and crank
shafts when changing the belt at 90,000 miles or more. Additionally, at
135,000 or more miles, consider replacing the timing belt tensioner, since
its bearing will not last much longer. Always carefully inspect the crankshaft
sprocket for cracks along the keyway that locks it to the crank. If your
front seals (or any engine seals) are leaking, or you find your dipstick
pushed up after running the engine, check your flame trap! For 960
B6300 series engines, see 960 Timing
Belt Change below.
l
drive the camshaft(s) and intermediate shaft with a toothed timing belt.
This part is replaced during normal maintenance every 45,000 or 50,000
miles, depending on your year and model. See the owner's manual.
It is highly advisable to change the seals on cam, intermediate and crank
shafts when changing the belt at 90,000 miles or more. Additionally, at
135,000 or more miles, consider replacing the timing belt tensioner, since
its bearing will not last much longer. Always carefully inspect the crankshaft
sprocket for cracks along the keyway that locks it to the crank. If your
front seals (or any engine seals) are leaking, or you find your dipstick
pushed up after running the engine, check your flame trap! For 960
B6300 series engines, see 960 Timing
Belt Change below.
Changing Timing Belt: Procedures for B23/B230 Series Engines.
1. For Pre-1994 B23/B230 Engines. See Michael Ponte's excellent website at http://www.mikeponte.com/volvo/timing.htm, a complete illustrated guide to changing the timing belt in B23/230 engines. The following is from Michael:
2. For 1994+ B230FD and FT
(incl EGR) Engines. See the detailed and illustrated procedure
at http://owners.volvocars.com
The login ID and password are "VIP" and "VISIONS". Text is as follows
(courtesy of Volvo):
4. Tips and Ideas. See
the sections below on Bolt
Removal, establishing Top
Dead Center, various Timing Belt Installation
Tips, and Adjusting
the Belt After Installation.
Changing
Timing Belt: Bolt Removal in B23/B230.
[Size Comment from Don Foster] A
24 mm socket fits the crankshaft pulley bolt on my '86 245 and my '91 740
(both B230 engines). A 1/2" drive Craftsman socket would probably be perfect.
On the B230, don't forget that an impact wrench is NOT a good idea because
of the risk of snapping the crank. You'll need some way of holding the
crank or pulley so you can use a breaker bar.
[Added Notes] I would like to add my experience
with the crankshaft bolt on the automatic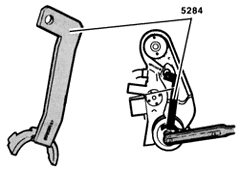 transmission
B230F. When the time came to replace my timing belt the first time, I tried
every manner of removal for my crankshaft bolt. Nothing would budge that
thing. Out of desperation, I sent off for the special
tool 5284 which turned out to be a godsend. In order to break the bolt
free, I had to literally jump and down on my 15 inch long wrench (I weigh
180 lbs.) multiple times. I bought the car new, so it came from the factory
way over torqued. Despite the upfront cost, the tool was a worthwhile purchase
and I would recommend it for anyone contemplating keeping their brick for
a long time. At the time, it cost me $45 US from an out of state dealer
who discounts 20% for out of state purchases. The tool for holding the
B230 crankshaft pulley to loosen/tighten the center bolt is called "Counterhold:
for vibration damper" Part # 999 5284-8
transmission
B230F. When the time came to replace my timing belt the first time, I tried
every manner of removal for my crankshaft bolt. Nothing would budge that
thing. Out of desperation, I sent off for the special
tool 5284 which turned out to be a godsend. In order to break the bolt
free, I had to literally jump and down on my 15 inch long wrench (I weigh
180 lbs.) multiple times. I bought the car new, so it came from the factory
way over torqued. Despite the upfront cost, the tool was a worthwhile purchase
and I would recommend it for anyone contemplating keeping their brick for
a long time. At the time, it cost me $45 US from an out of state dealer
who discounts 20% for out of state purchases. The tool for holding the
B230 crankshaft pulley to loosen/tighten the center bolt is called "Counterhold:
for vibration damper" Part # 999 5284-8
[Another technique:] Had same difficulty when changing belts on both 745 & 245, after much aggravation, bought a large (12", I believe, made by RIGID) plumbers' strap wrench at professional plumbers supply. This enabled me to hold pulley without damaging it so that I could remove it to change belt. [But: SEE BELOW for a Warning.] For really tight ones, it helps to have a cooperative assistant to hold strap wrench. [Another technique for tightening:] For the camshaft and intermediate shaft pulleys, what I did was wrap the old timing belt around the pulley as padding, grip the padded wheel with my largest channel-lock pliers, (a big pipe wrench would also do) and torque the bolt to 37 ft/lbs. [Another technique but SEE BELOW for a Warning:] here's a great way of loosening the crank bolt regardless if you have a stick or auto. All you need is a socket wrench and some blocks. Put the socket over the crank bolt and support the wrench with some blocks/bricks (on the driver's side of the crank). The blocks go under the head and handle of the wrench so that it (wrench) sits parallel to the ground. Disconnect your coil wire and give the starter a turn (about half a second). As the engine cranks over, the bolt will loosen itself against the wrench which is stationary against the blocks. I've done this about five times now and never fails. The harder part is actually removing the pulley!
[Two Caveats on Bolt Removal:] [Tip from Tom Irwin:] Here one problem to watch out for... B230 lower timing pulleys have a little 'nib' extrusion that does the work of a keyway/shaft. It is a cast part and it is delicate. In the old days we used to fix a large socket and breaker bar over the pulley bolt, wedge it against something solid and whap the starter over to break loose the bolt... DON'T DO IT! That little key/nib will break off or weaken so it breaks later and ALL your accessory drives (alt/ps/ac/etc) stops spinning. Oh yah! that little chunk o'metal is special order and about a hundred bucks! Get the right tool (Volvo 5284) and restrain the pulley
[Another Caveat Tip:] While the "strap around the crank pulley" method will work just fine on the 84 B23, I'd be very careful doing this to the 88 B230. The 84 B23 has a solid metal crank pulley that should have no problems with this method but, all B230's (that's 85 and newer) use a two piece crank pulley. Not two piece like the B23's pulley, two piece like a common harmonic balancer. In fact that's what it is, a center pulley section with a rubber strip sandwiched between it and an outer pulley section. The early B230's had some problems with the outer pulley section "moving" because the rubber was not holding it tight enough. This causes no problems until you try to set the timing etc. Remember where the timing mark is? That's right, on the outer section of the crank pulley, (harmonic balancer). Holding the outer section of B230 crank pulley to loosen/tighten the center bolt would tend to promote movement of the outer pulley section. The early B230's moved on their own without help, think of the movement possibilities with help! That being said, I wouldn't recommend holding the outer section of a B230 crank pulley to either loosen or tighten the center pulley bolt. If you plan on keeping your car and will be changing the timing belt yourself, buy a tool from Volvo they're not that much. As a heads up to everyone, if you find the timing mark "way off" when checking the ignition timing of a B230 (it usually way retarded). Make sure the pulley is OK first, before doing anything drastic. OK, OK you're right, buying a new B230 crank pulley is pretty drastic too, they don't come cheap. I've changed more than a couple pulleys, not only because you can't check the timing properly. It's because once the outer pulley section has moved you can be certain it's loose. Once it's loose, how long before it flies off completely! Will it happen at 70 MPH in traffic! Thankfully I've only seen this happen once or twice and no major damage was done but you do loose all the belts etc. and a tow truck is in your future.
[Another technique:] The inexpensive alternative (actually free using standard tools): After jacking up the car, remove the flywheel inspection plate (4 bolts) [Note: don't really know if this works for manual trans cars but I know it works on any of the AT cars with this inspection plate...AW trannys, not sure about ZF] Place a sizable screwdriver into the ring gear tooth closest to the bellhousing plate. With the other hand, use your ratchet/breaker bar with the appropriate socket on the pulley slowly and lock the screwdriver against the bellhousing as the engine and ring gear turns. Now, simply apply the necessary torque to break the bolt. [See below for a better variation on this flywheel technique but remember the caution above regarding breaking the cast key in the crank.]
To tighten/torque the bolt on re-assembly, switch the screwdriver over to the other side of the bellhousing and repeat except in the opposite direction. [Another caveat:] Don't even *THINK* about attempting this ring gear technique above if you car has a Crankshaft Position sensor. This applies to all cars with LH 2.4 or greater. On these cars, what you have access to through the inspection plate on the bell housing is a thin sheetmetal metal ring with little square windows evenly spaced around the 360 dg with two windows missing at TDC and TDC + 180dg (or is it TDC - 90dg and TDC + 90dg? can't remember.) Either way, these little windows look like the perfect place to put a square shank screwdriver, but the sheetmetal ring is very weak and if you bend it even the slightest there's a good chance your fuel injection system will get highly confused. I believe that if the ring is even 1mm out of round, the pickup may miss one or more windows.
Another Flywheel Clamping Technique from Barret Flake: A similar alternative to the one requiring the removal of the flywheel inspection plate: Remove or back out most of the length of the bolts (4) holding the flywheel inspection plate. Take the flat head screwdriver bit from your cordless screwdriver, I think they all are 1/4" hex drive, and slide it between the inspection plate and the bell housing with the flat head pushed in between the gear teeth. Now tighten the bolts to effectively clamp the screwdrive bit between the bell housing and the inspection plate. With this set up you don't have to worry about holding the screwdriver in the teeth while trying to simultaneously loosen the big bolt. Also, you don't have to switch the screwdriver from one side of the housing to the other when you retighten the crank bolt. Worked like a charm for me. (93 940 B230FT/AW automatic)
[Yet Another Bolt Removal Technique [Chris
Mullet] Remove the splash shield. After all drive belts are removed,
take the short wide one (from A/C) and hang it on the crank pulley only,
so that it dangles down below the car. Slide about a 4 foot long board,
under the air dam, through the hanging belt, and lodge the end under the
cross member or oil pan. (I used a 2x6 with a belt I knew I was going to
throw away. You could probably round the edges of the board, use a pipe,
or just be a little careful if you are worried about hurting the belt.)
With one foot, push down on the front
end of the board in front of the bumper, until you just start to compress
the motor mounts. I dont think it will take much weight as you have quite
a mechanical advantage. While holding down on the board, take your
breaker bar and solid hammer and knock the bolt loose.
You can use the same method to retorque
the bolt.
Now, some people will say you run the
risk of spinning the center part of the pulley inside the damped outer
section. I guess thats a possibility, but by pulling down firmly on the
outer pulley, versus just holding it stationary with some other strap type
holder, you increase the friction between the two....dont you?
Tightening the Crank Bolt with a Belt. Crank Tightening. [Tip from Carl Buxbaum] After replacing my timing belt, in order to tighten the crankshaft pulley bolt to 60N/M, I wrapped one of the old drivebelts around the innermost groove of the pulley, and notched a couple of teeth of the belt over the top of the water pump, where there are a couple of ridges that helped hold it there. While grasping the belt with my left hand I was able to tighten the bolt to spec with my right without too much difficulty.
B230F Crank Bolt Torque on Re-installation.
[Abe Crombie] Torque this bolt to 60N-m (45 ft-lb) plus an additional 60
degrees (1/6 turn).
Timing
Belt Tips: Top Dead Center. [Query] How do I find TDC on
my B230F when changing the timing belt? [Response: Don Foster]
Pull plug #1 and stick your finger in the hole. Turn the front pulley with
a socket wrench until you see the timing mark (front of timing belt cover
and on front pulley) coming up on 0 degrees. If you feel no pressure in
cylinder #1, then it's TDC but on the exhaust/intake stroke.
Continue turning the front pulley until
you feel pressure on your finger as you approach 0 degrees. At 0
degress, you're at TDC for #1.
Remember that as you replace the belt,
you should "fine tune" setting the crank and cam at their alignment marks
(the I-shaft isn't important on a 700, but it's good practice to do it).
Timing
Belt Tips in B23/B230. [Tools and Aftermarket Belt Query]
I am going to be replacing the timing belt and front engine seals, on a
91, 740, non-turbo, sedan, B230F engine. I have a few questions: Does anyone
besides Kent-Moore make any of the Volvo Special Service Tools? Are aftermarket
timing belts and seals okay on quality from somewhere like PepBoys? Will
I need a Vibration Damper (Harmonic Balancer) puller for the Crankshaft?
[Response 1: Phil] Pep Boys is not known
for good belts...at least the ones I've tried. You're better off
getting a name brand belt. Both TRW and Goodyear brands both have the markings
on them and I'm sure other name brands do also. I don't know of a need
for any special tools for the seal. You may want to get a set of those
seal installing bushing pusher-inners. Or use a piece of pipe, a socket
etc. Some folks here coat the OD of the seal with silicone sealant. I just
use Compound 111 or you can use a little grease. Go easy, keep it straight.
[Response 2: Zee] Contitech is an aftermarket belt that my shop has used
for decades. I liked the fact it had lines on it marking the positions
of the timing gears. Great help on the install. (you will only see the
lines for the two top gears, though, as the crankshaft marks are well out
of sight at the 7 o'clock position.
Removing the A/C Compressor Belt. [Tips from Justin Seiferth] This can be tough. Loosen the 12mm holding bolt and the unscrew the 10mm tensioner bolt till there's a 1/4" of slack or so. If you still can't remove the belt, try unscrewing the 13mm mounting bolt just below the A/C compressor, this should give you enough slack. When putting the belt back on, make sure this mounting bolt is retightened. Put the A/C compressor belt onto the bottom of the crankshaft pulley and use the crankshaft bolt to turn the engine and inch the belt back on. It's a tight fit.
If you have a two piece timing belt cover, you can't remove the bottom half until you've taken off the crankshaft pulley. Be sure to put this cover back on after you've changed the belt and before you reinstall the pulley!
[Avoid These Goofs: Tips from Gary
DiFrancesco] This is one of those goofs that not everyone wants to fess
up to, but sharing it could save someone a lot of grief. Several
weeks ago, I replaced the timing belt in my '88 745T. The job seemed to
go normally. A few weeks later I noticed what sounded like a worn bearing
squawking away in the area of the tensioning pulley. I did not change the
pulley when doing the belt since it seemed to be in good shape, and running
smooth. When I removed the timing belt cover to replace the pulley, I found
the compartment full of black fuzz. It was apparent the source of the fuzz
was near the crank, and evidence of abrasion was visible on the outside
edge of the timing belt.
To make a long story short, I reassembled
the lower timing belt gear (on the crank) incorrectly. The outside flange
for the timing belt gear was put on the shaft backwards. The subtle flare
of this flange was pointing in and was rubbing the edge of the timing belt.
I lost about 1/16" of the width of the timing belt in less than 400 miles.
This error is not hard to do since the flange can go on the crankshaft
both ways. Since I was about to go on a 1300 mile trip with the family,
I immediately replaced the timing belt again and triple checked that the
flanges were put on in the proper orientation. The lesson here is
obvious; double check your work before covering everything up. It might
just save you some grief.
Timing Belt Marks [Tip from Ross Gunn] The OEM belt has some printed lines that you position at the timing marks on the three pulleys, but other than that not much difference. You still have to find the timing marks and it can be a nuisance trying to position the belt on the marks on the pulleys.
[Tip from Justin Seiferth] If you have
factory belt with alignment stripes on it, use a piece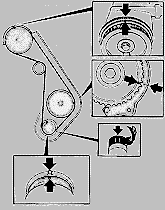 of chalk to extend the alignment marks onto the front of your new belt.
This will make installation just a little easier. The "alignment dot" on
the lower right-hand pulley is hard to see. Stick a small screwdriver into
the slot and line up with the dot on the pulley to see if the pulley and
alignment dot are aligned correctly. The belt may be a bit small to get
on easily- get an assistant to use a pipe wrench to compress the tensioner
just a little.
of chalk to extend the alignment marks onto the front of your new belt.
This will make installation just a little easier. The "alignment dot" on
the lower right-hand pulley is hard to see. Stick a small screwdriver into
the slot and line up with the dot on the pulley to see if the pulley and
alignment dot are aligned correctly. The belt may be a bit small to get
on easily- get an assistant to use a pipe wrench to compress the tensioner
just a little.
[Timing Marks Tip from Mike] The crank timing mark is on the thin metal washer you removed after you removed the pulley. It is keyed. I determine which tooth on the crank gear it lines up with and then line that gear tooth or valley up with the mark on the motor. Be sure to position the washer with the flanged side facing out or it will tear up your new timing belt.
[More from Ross Gunn] With the aftermarket belt, if there are no printed marks, just ensure the timing marks on the pulleys are lined up with the marks on the engine and you will be fine. The tricky one is the intermediate shaft. You will have to either look through the rad core with a light held between the rad and the block or hold a mirror directly in front of the timing mark and at 45 degrees so that you can look down from the top to see that the pulley mark and the mark on the plate behind are lined up.
It helps if you line up the cam pulley mark before removing the old belt and then be careful not to let the int shaft pulley move when installing the new one. The mark on the plate behind the int shaft can be hard to find - try to locate it after lining up the cam pulley marks and before removing the old belt. It would be wise to locate the crank pulley mark and corresponding mark on the block at the same time.
I suggest removing the old belt with a
sharp knife to avoid disturbing the position of any pulleys. Before
removing the old belt, compress the spring on the tensioner and insert
an appropriate pin in the hole in 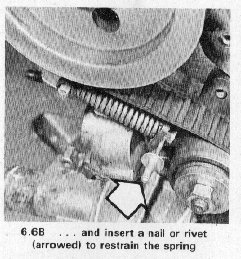 the
rod inside the spring to retain it in the compressed
position. Remove the pin after the new belt is installed. [Don
Foster] You know, of course, to first squeeze the tensioner back
and lock the nut to hold it. Once the belt's in place release the lock
nut so the tensioner presses against the belt. Tap it lightly -- this takes
up the slack -- and lock the tensioner nut (37 lb.-ft).
the
rod inside the spring to retain it in the compressed
position. Remove the pin after the new belt is installed. [Don
Foster] You know, of course, to first squeeze the tensioner back
and lock the nut to hold it. Once the belt's in place release the lock
nut so the tensioner presses against the belt. Tap it lightly -- this takes
up the slack -- and lock the tensioner nut (37 lb.-ft).
[Tip from Steve Seekins] Rotate crank so that mark is about 9:00. Then put on belt - double marks straddle the crank mark (notch on outer plate). - be sure to get it right. Then put belt on intermediate shaft sprocket - line up mark and clip with a medium binder clip or one of those plastic woodworking spring clips. Do the same for the cam sprocket - you may need to use a wrench to turn the cam so the mark lines up with index mark on the belt - if the marks will not line up, you likely have the belt backwards - all three will only line up one way. Do not worry about rotating components individually - this is a non-interference engine. Before you remove the clips, double check to make sure that the crank mark is lined up with belt marks. Release the tension roller, rotate crank 2X clockwise with wrench and tighten tension roller. Replace covers, pulley, belts, fan and you are finished. After a couple of hundred miles, remove rubber plug in timing cover, loosen tension roller and rotate crank CW 2X again and tighten. Don't touch it again for 50k miles.
Indexing the Timing Belt Markings. [Tip from Randy] Lets assume the belt that is currently on there is correct. All you want to do is replace it with a new belt- you want all the orientations to remain the same. Mark the current belt in some permanent way in relation to the gear. If the timing marks on the gears match up with an individual cog on the belt that will be perfect- if they don't you might have to make your own marks on the gear (fingernail polish comes to mind). The point is once you have the belt indexed to the gear arrangement you can easily remove it and you could put it right back on and be confident of getting it correct because you have the index marks on both the belt and the gears. So all you have to do is take the indexed belt off and carefully transfer your index marks on the old belt to the new one. Do this very carefully and be sure you match cog for cog as you move around the belt and mark the new belt exactly like the old one. BE CAREFUL to double-check the markings before going back to put it on. You might want to mark the front of the belt for reference in relation to the front of new belt. Some belts are already marked when new, but I always mark my own. [Response 2: Paul Kane] The intermediate shaft is no longer important. I use white-out (correction fluid) to mark stuff. The Cam mark is at 12:00, the notch on the belt guide on the crank is at about 10:30 and IS the cast mark on the block. BTW the notch in the center pulley aligns with the pointer on the lower cover.
Do I Wrap the Belt First Over the Crank
or Cam Pulley? [Don Foster] My preference is bottom-end
up -- replacing a timing belt, I mean. The trick is, first, lining
up the three pulleys to the timing marks (timing the I-shaft isn't important
on a 740, but it's still good practice). Then start at the bottom by fitting
the marked tooth into the gear at the timing mark, and wrapping the belt
upwards. (I confess that I use small Vise-grips to loosly clamp the belt
to the crank pulley.) Wrap the belt around the intermediate-shaft
pulley, around the cam pulley (observing alignment of the belt mark with
the pulley timing mark) and slide it around the tensioner pulley.
Belt
Adjustment After Installation in B23/B230. [Response: Stoney]
I just got email from 2 dealer techs I know, with 18 and 20 years experience
between them both are top VISTA techs and they said that the belt should
be adjusted after 5-600 miles due to the fact that a new belt will stretch
some in the first 1000 miles and they have seen a few "jump the cam gear"...
[Response 2: Don Foster] The tensioner has a spring in it which forces
the idler against the belt to a predefined tension. But then, when you
tighten the nut on the tensioner, you lock its position. The instant the
belt stretches one hair, the tension is relaxed (because the tensioner's
position is fixed, it can't move inward to maintain the force).
The tensioner, in this configuration, compensates for (adjusts for) the
increased length from stretching -- to prevent it from jumping a tooth.
It DOES NOT maintain a constant force on the belt. It's assumed a
new belt will "relax" a bit during when first used, so you must loosen
the nut, allowing the spring to again reposition the idler. This "consumes"
the extra length from stretching -- but then you tighten the nut again,
locking the idler's position. Ideally, there will be virtually
NO tension on the belt, but also virtually NO "slop" in the belt.
Hence, after about 500 miles, more or less, remove the rubber plug from
the timing belt cover, loosen the tensioner locknut, rock the crank slightly,
and tighten and retorque the locknut.
Timing
Belt Tensioner. [Question:]I recently acquired
my 1986 760 turbo and was told by someone that the timing belt tensioner
should be adjusted periodically. Could someone telll me when this is supposed
to be done? I recently changed the timing belt and water pump (6000 miles
ago). [Response:] It is wise to allow the tensioner to take up slack once
a few thousand miles after belt is renewed. To do this you rotate engine
in the normal direction (CW) 1/8 of a turn. This makes sure that belt has
tension on the drive side between cam and crank gears. When you shut down
engine it will often kick back afew degrees and tighten the backside of
belt and then loosening tensioner bolt will allow belt to actually get
looser. Then loosen the tensioner bolt one full turn and then retighten
it to 37 ft-lbs. You will likely hear the tensioner jump as you loosen
bolt.
New Tensioner Spring? [Query:] Just
bought a new timing belt tensioner for my 1985 740 Turbo. 226k miles and
it has never been changed. The new tensioner I bought did not have a new
tensioner spring attached to it. My question: Should a new tensioner spring
have been included and/or do I need to change the tensioner spring with
this many miles. [Response: Don Foster] A new tensioner every 150k
is the prevailing wisdom as I understand it. No spring -- reuse the
existing spring. You'll note a small hole in the shaft inside the spring.
Compress the spring with old tensioner and slide a nail through the hole.
Remove the tensioner and install the new one. Then pinch up with a big
pair of Channelocks and remove the nail. And at 225k miles, start
thinking about the three front seals and water pump -- perfect time to
do all that stuff.
Accessory
Belt Tightening and Maintenance. [Problem: Squeeling belts; how
to set tension?] I'd be surprised if this wasn't simple belt squeal, but
you can easily isolate the problem. Take a spray bottle of water (like
your significant other's favourite plant mister) filled with water. With
the engine on fast idle, spray a stream at each belt separately. The world
will all of a sudden get real nice and quiet when you've hit the problem
belt(s). If that doesn't alter the noise you've been noticing then you
can look elsewhere (like bearings in the water pump, alternator, power
steering, etc.).(PS. While you're in there with the plant mister, shoot
the base of each injector with water. If the engine stumbles at all then
that's a sign that the injector seals need replacing. Now get that plant
mister back into the house before it's noticed missing.)
[Editor's Note: see http://www.dayco.com
for a discussion on the various kinds of belt noise and causes.]
Tightening the belts will normally eliminate
the squealing, but you don't want to overtighten lest you shorten the life
of the water pump and/or alternator shaft bearings. The spec usually calls
for a 1/4" max deflection at the mid-point of the longest span, but a heavy
thumb can often get 1/4" even with the belt overtightened. I prefer to
run my belts not too taught because of this and consequently a tendency
for belt squeal is the price I pay. You can eliminate this by keeping the
belts in top shape:
-replace at the first sign of fatigue
(fraying, hardening, cracking)
-replace the main belts only in
pairs to keep the tension uniform (any difference has to be adjusted with
shims in the crank pulley)
-try swapping the main belts periodically
to change the tensioning
-de-glaze the belts and pulleys
(with sandpaper and/or emery cloth)
-extend belt life and grip using
belt dressing compound (available in spray cans from any good auto supplier)
and to do the job properly take the belts off to
soak them.
-check that all pulleys are aligned
(any belt deflection will only hasten belt wear, glazing and squealing)
[Response: Steve Ringlee] When you adjust the belt tension, take a look at how the adjuster mechanism works before you go at it. Loosen the 13mm or 12mm lock nut on the belt side of the mechanism. This unlocks the alternator or compressor and allows you to adjust tension with the long 10mm bolt parallel to the belt. This latter bolt is only used to position the alternator. Once you have set belt tension (3/16 to 5/15 inch or 5-10mm deflection) with the long bolt, lock the position with the 12 or 13mm bolt and back off a turn on the positioning bolt to unload it. Don't forget to lock the nut or your belt tension will eventually fracture the adjusting bolt.
Alternator
Belt Change. [Query] I am attempting to replace the alternator
belt on a 1988 740 GLE. I am having problems removing the power steering
belt so I can get at it. I have loosened the bolt on the adjustment
strap, but it will not budge. Is there a pivot bolt somewhere that
is not readily apparent. [Response 1: Bruce] If this is a B230 engine,
the steering belt does not need removed to replace the alternator belt.
The steering pump adjuster arm attached to the block sometimes needs
loosened. The bolt going through the bottom of the steering pump itself
sometimes needs loosening so it can pivot. You can also loosen the adjuster
strap and back out the 10mm head adjuster,
then pull up on the steering belt will
make the pump pivot and give belt slack. [Response 2: JT Charger]
You have to also loosen the 13m/m lock nut, before the 10m/m adjuster bolt
can be loosened and backed off.
Alternator Belt Slips and Doesnt Charge. [Query:] My alternator belt is squeaking and the alternator is not charging properly. [Response: Don Willson] Check the harmonic balancer for the cause of squeeking. Paint a stripe from the hub to the rim. Run the car until you hear the squeek. Look at the stripe, if it is displaced replace the harmonic balancer. The rubber insert loosens and slips after a time.
960 Timing Belt Change in B6300 Series Engines.
960 Timing Belt Maintenance Intervals
[Query:] I've heard that the timing belt for the 960 series has to be changed
more frequently than stated in the owner's manual. I was wondering if anyone
was advised to replace the tensioner as well and if there was a bulletin
from Volvo recommending changing the tensioner at 100,000 miles.
[Response:] Follow closely the recommended intervals. The '92 timing belt
should have been changed at 20k miles and again at 40k miles. At that time
a modification should have been done under warranty. This extends belt
life another 10k miles, so the next belt change should be done at 70k miles
then every 30k after that. This is only for the 1992 cars!
[Details from Abe Crombie:] The
92's had an interval of 20K. Volvo developed a damper assembly that
fits onto exhaust cam that was retrofitted to 92's (if it was being taken
to a dealer AND the technical service bulletin was performed) and was factory-fitted
to 93's that allowed the 21mm wide belt to last 30K due to less cyclic
loading on belt. You can see the damper if is installed by looking
through the holes in the cam gear on exhaust cam. The damper will make
seeing the aluminum head through these holes difficult, especially if you
compare to the intake cam pulley which is the same part but will have no
damper fitted. The 94's have a revised damper and some belt driven
pulleys revised and a 23mm wide belt is used (belt is different length
than 21mm belt) to give a 50K interval. The 95-98 engines got a complete
re-do of the belt drive and use a 28mm belt to give a 70K interval.
960 B6304 Timing Belt Change.
[Tip from Larry Borella] Recently there was an exchange posted concering
replacement of 960 timing belts. I did mine Saturday. All things considered,
it was easier than replacing the belts on my 740. Here are a few hints
if you are inclined to do this yourself.
Start by removing the electric fan. Take
out the two screws and then pull the wiring loom connectors from the shroud.
Then you can just put the fan on top of the overflow reservoir/ac dryer
and you don't have to take the battery out etc.
Remove the acc belt (I use a 3/4 in adapter
on my 1/2 drive breaker bar). Take off front cover. I changed the plugs
at the same time so I left the plugs out so it is easier to turn the crankshaft
pulley to align the timing marks on the cam pulleys. I used either an 1
and 1/4 socket to turn the crank. The notch on the crankshaft pulley is
hard to find. You have to look straight down; its on the back side hub
of the pulley. The matching mark is on the back of the plastic timing belt
cover (which is not removed). Get them all lined up, then remove
the top bolt from the belt tensioner. Then back out the bottom bolt about
1/4 to 1/2 inch. Then you can twist the tensioner which will pop the plunger
from its position. Then you can take it off and remove the belt (there
is a metal guard held on by two bolt behind the crankshaft pulley that
must be removed from under the car).
Put the new belt on. The manual says start
at the crankshaft pulley then work up and around in a counter clockwise
direction. You have to compress the tensioner before installation.
I put it in a vise (the vise has to open about 6 inches to hold the tensioner.
If you were hard pressed, I think you could do this in a large c-clamp.
The resistance on the tensioner is significant. I found that turning the
vise about a 1/4 turn then waiting about 3 to 4 minutes before the next
turn worked well. When you get it compressed, there is a keeper hole (make
sure you line up the hole before you compress the tensioner) into which
you must insert a pin to hold it in the compressed position. I used a 1/16
inch drill bit. Then you put the tensioner back on. I found that
putting the top bolt in first worked best. You can push the bottom of the
tensioner to get the bottom bold lined up. If you do it the other way,
you have try to pull the tensioner (working from the passenger side of
the car).
Now you rotate the engine two revolutions
and check the alignment. Guess what. Mine didn't line up as well as I would
have liked. The cam pulleys were fine but the crankshaft pulley was slightly
"advanced" (maybe 5 degrees). I did it all again.
Same result. I took it off and did it
a third time making doubly sure I had all the belt lugs where they should
be.
Same result. I spun the engine with the
starter (with the plugs still out). All seemed well. I bolted her up, put
in the Bosch +4's, started the car and went for a test drive. Runs fine.
Two notes of caution. If you leave the
plugs out for anything, put the ignition coil cover back on. Those openings
look just like a funnel designed to put a dropped screw/nut into the cylinder.
Second, don't leave plugs in too long between changes. If they seize up
and break off when you try to remove them (as I have heard happens fairly
regularly), you got real problems. I put penetrating oil around mine before
I removed them and even so, they were uncomfortably tight with only 50
k on the car.
More 960 Timing Belt Instructions [Procedure from Larry Jacobson]
This has play by play instructions about the 960 timing belt.
Today was the day to attack the timing belt on my 1996 965. I've changed lots of timing belts on lots of cars, but this was the first time I dug into the 2.9 ltr Volvo. Apparently there are no worthwhile aftermarket manuals for this car. I am grateful to an herein unnamed (for his own protection) list member for snailmailing me a copy of the appropriate section on a genuine honest-to-goodness, bona fide and sanctified Volvo shop manual.
The bottom line was it took me 2.5 hours. It is not as difficult as the belt on the 2.3 ltr 4 cyl engine. No special tools are required. I'm sure I could do it again in 1.5 hours now that I know how. The following are my observations.
If you are going to do this job plan to change the oil and filter at the same time, inspect the front brake pads, change the serpentine accessories belt, and if you suspect the integrity of your water pump ... do that too. You can't get back to the water pump without first taking out the timing belt.
Before starting you will need common mechanics tools, ratchets, a variety of extensions, a big vice or a 6 inch C clamp, and probably a big pipe wrench. A dental mirror would be handy and some very good lighting. There are some things that are difficult to see.
Procedure:
1) Jack up the front end of the car and
suspend it on jack stands. Probably best to remove the front wheels.
Check the brake pads while you are there. You are going to need enough
room to get underneath to work.
2) Remove the belly pan that covers the oil filter. You might want to change the oil and filter now.
3) You're going to need two pins that will be used to hold things in place. Locate them now before you need them. a) Take a 16 penny common nail and cut it to 1 inch so that you have the head plus one inch. It will be used to hold the serpentine/accessory belt tensioner in place while you take off the belt. b) Locate a 3 penny common nail. It will be used to hold the timing belt tensioner in place while you reinstall it. Don't cut the 3 penny nail.
4) There is no need to remove the electric fan.
5) Draw a picture of how the serpentine
belt is routed. If you don't know how it came off it is going to
be real difficult to get it right when you try to put the new one back
on. Now remove the serpentine belt tensioner. There is a tapered
square hole that will fit 3/4 inch, 1/2 inch, and 3/8 in square drive.
However you'll need a very short extension to fit deep enough into that
hole. I couldn't find the right size so I just took a large pipe
wrench and moved the tensioner. Line up
the holes and slip the cut off 16 penny
nail to hold it in place.
Remove the two 12 mm bolts that hold the
tensioner in place and remove
the tensioner. Now remove the serpentine
belt.
6) Remove the timing belt cover. It is held on by only one 12 mm bolt.
7) Crawl under the car and locate the shiny metal 'vibration damper guard'. It's held on my two 10 mm bolts. Unscrew those bolt and remove the shiny cover to expose the crankshaft gear and the lower end of the timing belt.
8) There is no need to remove the vibration damper. If you turn it slowly using the small bolts you can turn the engine to line up the timing marks. Turn it clockwise while looking at the front of the engine. The cam timing marks are obvious. The crank timing mark is not obvious. I used some of my daughter's silver nail polish to mark the crank's relationship to the block and the timing marks on the two cams. I also marked the existing timing belt so that if worst came to worst I could count the cogs between the various timing marks.
9) Tensioner efficiency: Before you take off the tensioner and the timing belt, take a moment to notice the tension on the belt between the exhaust cam and the water pump. It seems to move about 1/4 inch with about 10 lbs lateral pressure. This is purely a guess based on what I thought it felt like.
10) Remove the tensioner by a) slacking the two 12 mm bolts, b) removing the upper bolt, c) rotating the tensioner clockwise a little, d) removing the bottom bolt and lifting out the tensioner.
11) Remove the timing belt by first removing the two 10 mm bolts that hold the plastic housing on the top of the shroud at the top on the engine. No need to actually remove this top shroud. With the bolts out it can be moved enough to get the belt out. Remove the belt off the cams. Then get under the car and very carefully work the belt off the crankshaft gear. ...remembering how you got it off because it's like a Chinese puzzle to get the new belt back on.
12) Take a good look at the tensioner assembly. It is an hydraulic affair and it should not be leaking oil. If it is leaking you need to replace it. That tensioner fails the belt will jump cogs and the motor will be destroyed.
13) Compress the plunger back into the tensioner. First remove the white nylon positioning ring. Line up the three little holes so you can place the keeper through them to allow you to reinstall the tensioner. A vice would work well to compress the tensioner. My vice was not large enough so I used a 6 inch C clamp. Compress the plunger a quarter turn at a time allowing it to 'rest' between twists. When the plunger is all the way flush with the housing push a 3 penny common nail into the hole with the head of the nail facing out so you can pull the nail out when the tensioner has been reinstalled. Place the nylon guide back on the tensioner. (a new one probably came with the new timing belt)
14) Inspect all the idlers for smooth operation. Inspect the water pump for leaks. This is the time to change the water pump if it isn't in good shape.
15) Install the new belt. I found it was easiest to snake the belt down to the crankshaft gear before trying to place it on any of the other gears or idlers. Crawl under the car with a good light to work the belt on to the crankshaft gear without crimping it in any way. Once it's on the crankshaft gear, then put it on the intake cam and remove all the slack between crank and intake cam gear. Then do exhaust cam and then water pump and finally the idlers where the tensioner goes. You want all the slack at the tensioner idlers.
16) Install the tensioner. Tougher than it first looks. There's not much room between the tensioner and the fan for fat fingers. Locate the top bolt first and get it started. Then do the bottom one. Make sure the tensioner seats itself flush on the front on the engine and torque it down. Volvo says 18 ft pounds (25 Nm). I couldn't get a torque wrench in there. Regardless, that's not a lot of torque.
17) Critical point: carefully inspect all your timing marks. Is there slack anywhere except around the tensioner? Is the belt fully seated on each gear? If everything's OK, take some pliers and pull out the 3 penny nail that has been holding in the plunger on the tensioner. It comes out fairly easy. The tensioner will ease itself back into position and will take up all the slack on the tensioner side of the engine. Inspect by feeling the tension between the exhaust cam and the water pump. Does it feel about as it did before you took the belt off. Are the timing marks still where they are supposed to be?
18) Crawl underneath to make sure the belt is seated on the crankshaft gear. If it is in place, reinstall the vibration damper guard. Reinstall the splashguard that covers the oil filter.
19) Reinstall the two 10 mm bolts that
hold the top of the cam belt shroud on the top of the engine.
20) Volvo recommends you make the
crank turn two complete revolutions to make sure all the timing marks are
still in place. That's more difficult than it sounds. I skipped
that step and crossed my fingers.
21) Reinstall the timing belt cover.
22) Install the Serpentine/Accessories
belt tensioner. While you are doing that snake the new belt around
the accessories and locate the tensioner and bolt it down. Be very
careful to be sure the serpentine belt is seated in the middle of all the
pulleys on its route. When you are sure it is correctly positioned
turn the tensioner just a little and remove the cut off 16 penny nail that
you installed at the beginning of this operation, allowing the tensioner
to take up all the slack in the
belt.
23) Carefully inspect the engine bay for tools and stuff.
24) Voila! You have successfully changed the timing belt and the serpentine belt.
Parts: Timing belt is Volvo part 271876. Serpentine belt is Volvo part 9146106. It is stamped Made in USA Dayco. You can probably find it cheaper in a parts store under the Dayco brand name.
960 Engine Pulley Timing Marks.
[Query] I saw your posting on the internet about changing the timing belt,
and wonder if you could help me with a question. I changed
the belt on my '94 960 and put the new belt on just like the old one came
off. The car ran just fine, so I should have left it alone. However,
I noticed that the timing marks on the two camshafts did not align as the
service manual showed that they should. The intake mark was four teeth
off, and the exhaust was one tooth off. So I changed them to what the book
showed, but the car ran ragged. I changed them back, but got confused
somewhere along the line. Now I can't get them aligned at all, and the
engine won't rotate all the way because of the valve/piston interference
(I didn't crank it, just turned the motor gently with a socket wrench,
so I haven't damaged the internals of the engine). The service manual
says to align the marks on the camshafts with the indicators on the cover
plate, and to align the mark on the crank pulley with the oil pump housing.
I've studied the crank pulley and can't find a mark anywhere on it for
reference. Do you know how to determine the correct position of the
crank shaft when aligning the timing belt?
[Response: Jim Bowers] Sounds like someone
has replaced seals, had the pulleys off and didn't take the trouble to
put them back on with the marks lined up. Now the only way to get them
set properly is to use the Volvo alignment tools. There is one that holds
the cam shafts and one that holds the crank. The camshaft tool is about
$300 and the crankshaft is about $60 from your friendly Volvo parts dealer
if he can get them in a reasonable time. I suggest you take the car to
the dealer and ask him to set the timing and be sure to tell them to make
sure they line up the marks so you won't have this problem next time.
960
Serpentine Belt Installation. [Query:] My son's 960 needs a new
serpentine belt and I planned to install it. Has anyone had this
experience and how difficult is it? [Response: Bruce] It is not difficult
to install. You can remove the three top screws holding the electrical
fan into the top of the radiator. Pick the fan assembly up and place it
along side the exhaust manifold. This gives more room when replacing the
belt. Take a good look or write down how the belt travels around all of
the pulleys first. You will need a 3/4" or a 3/8" wrench to move the belt
tensioner. Depends on the year of the car. The tensioner has a 3/8" hole
for a 3/8" ratchet to be inserted and move the tensioner assembly as to
release the belt tension. There will be a small hole to insert a 1/8" or
3/16" cotter pin in to hold the tensioner in the released position. Remember
how the old belt is routed. It can be installed in different configurations
but only one will be correct and fit properly. Remove the old belt and
install the new belt. Release the tensioner and you are all done. [Response
2: J. Charger] a smart guy could "unload" the spring loaded tensioner with
a very large set of channel lock pliers, then change the belt, with out
special tools. on the other hand, the adapter tool needed is probably
less than $10, from Volvo, to adapt a 1/2" drive ratchet to the tensioner.
A normal byproduct of a normal engine operation
is "blow-by", or a slight leakage of combustion gases by the piston rings
and into the crankcase. It is very desirable to release this pressure.
Years ago it was simply vented into the atmosphere. Later, it was vented
into the intake system through the air filter. More recently, it is forcibly
removed using engine vacuum and certain controls. This system burns the
vapors, reducing the environmental problems.
On the Volvo B21/23/230 engines, this
is accomplished with the contraption we call the "flame trap" or guard, but
the system also includes a flame arrestor, the oil separator, some hoses,
and a fitting on the intake manifold.
but
the system also includes a flame arrestor, the oil separator, some hoses,
and a fitting on the intake manifold.
Excess pressure can force oil past seals.
Excess pressure can damage seals and gaskets. Excess pressure gunks up
engines. Excess pressure vents into the atmosphere, which is not good for
the environment. On the 240 with the B230, excess pressure can pop the
plug outta the back of the cylinder head (happened to my daughter and she
won't let me forget it). Crankcase vacuum is directed through the
"flame trap" system. During normal driving, engine vacuum is from the intake
manifold (upstream of the throttle), through the top of the flame trap,
through the flame arrestor, through the oil separator (a.k.a. "breather
box") and to the crankcase.
During idle, when there's insufficient
vacuum, additional vacuum comes through a small hose attached to the flame
trap and to a small fitting in the center of the intake manifold.
The flame trap consists of a lower hose
(which sits directly on the oil separator), the upper hose (which has a
large and a small fitting for vacuum hoses), and the flame arrestor. The
gases in the crankcase are highly combustible, so it's very important to
prevent igniting them with a backfire. (If you did, you'd be replacing
all your engine seals and gaskets, or maybe your car.) The flame arrestor
will absorb the thermal energy from a backfire and quench a flame front.
(Note -- this is a very old technique, used during the last century in
coalmines when the miners had acetylene lanterns.) So it blocks flames
but passes gas.
The oil separator is bolted to the block
and is a single molded plastic unit. I don't know how to take one apart,
although I've successfully cleaned out several of them. They're cheap enough
that you might buy a new one without a second mortgage. The function
of the separator is to allow the oil vapor and droplets some time and space
to coalesce into larger drops and flow back to the sump. The separator
has two openings into the block -- one for vapors to rise through, and
one for the oil return. The oil return opening has a hose that MUST remain
in place -- don't dislodge it, or you'll be pulling the pan.
The flame trap is located (buried is more
truthful) under the intake manifold between headers 3 and 4. It sits directly
on the oil separator. Cleaning the system includes cleaning or replacing
the top 'n bottom hoses, the brass or plastic arrestor, the large hose
to the intake manifold, the small hose, and the small fitting. And the
oil separator. The small hose and small fitting (in the manifold)
are famous for plugging. Clean the fitting, replace the hose. Inspect
the arrestor (old style=brass, new style=plastic) to confirm the passages
are clean and free. If not, either wash or replace -- they're only a buck,
or so. Buy a handful. Volvo sells a "kit" which includes the top
'n bottom molded hoses and the arrestor. It's worth the few dollars.
A coupla quick checks....... With the
engine idling, pull the small hose off the flame trap and feel for vacuum
-- it should be there. Pull the trap off the oil separator and observe
(or feel) the separator to confirm that crankcase vapors are streaming
up.
Do the "jiggle test" -- with the engine
idling, loosen the cap but leave it in place. If it sits there quietly
then there's enough vacuum to hold the cap. But if it jiggles and bounces,
you have insufficient vacuum (and maybe too much pressure). [Editor's Note:
This test is reliable only with the earlier metal cap, not the plastic
cap.] It's conceivable that a partially blocked system might provide
slight vacuum, requiring only a little finger pressure to hold the cap
down. If so, I'd start thinking about some preventive maintenance.
For the technically-inclined....... I
built an adapter and measured the crankcase vacuum at idle. All four of
my registered Volvos ('82 245 with 335k; '82 245 turbo with 130k; '85 245
with 235k; and '91 740 with 180k) measured from 1.75 to 2.25" of water,
vacuum.
Flame
Trap & Crankcase Ventilation Questions.
Basic Crankcase Ventilation Maintenance:
[Response: Don Foster]
Excess Crankcase Pressure. [Query:] My Volvo has recently developed a case of extreme crankcase pressure. I noted on more than one occasion that the oil dip-stick had been blown up from the tube, spraying oil throughout the engine compartment. I replaced the original flame-trap element with the newer factory plastic resin type, cleaned the manifold orfices, changed the oil and filter and checked the results. Once again, the oil dip-stick was blown up, and another oil-bath was applied to the engine compartment. The only way I can make he dipstick remain in place is to use an elastic cord holding the stick to the manifold. I am obviously missing something here... How else can I relieve this pressure? [Response 1:Don Foster] On your engine, the major components of the crankcase ventilation system needing attention are:
Excess
Crankcase Pressure? Dipstick O-Ring Fails. [Comment from Randy:]
I had what I thought was an excessive pressure problem in my 90 740 with
the b230f. Had the same problem with the dipstick blowing out and bathing
the engine compartment in oil. The flametrap and all the plumbing was not
restricted. I even went to far as to hook up a pressure gauge to the crankcase!
Findings?? There wasn't the tremendous pressure I expected to find. Solution??
Replaced the O-ring on the dipstick- problem solved. It is worth the investment
in a new O-ring to check it out.
Oil Breather Box Beneath Flame Trap. [Query:] My crankcase pressure is still high, even after cleaning the flame trap. How do I clean the breather box? [Response 1:] The black box under the flame trap is often called a "breather box" -- I don't know what Volvo's official name for it is. [Editor's Note: See http://www.mikeponte.com/volvo/oiltrap.htm But its function is to provide a low-velocity space for fine oil mist and droplets to collect (or coalesce) into larger drops that can flow back into the crankcase. Yes, it can get clogged, and can be removed and replaced. It can also be removed, cleaned, and reinstalled. Others have wisely pointed out that there is a hose connected to this box inside the block. This hose goes back down to the sump, and is held in place with clips. When removing the box, be careful to NOT disturb or yank this hose. I cleaned it out on my '86 245GL -- removing it was a minor job. As I recall, I had to twist a bit to get the socket in there, but the real problem was just seeing what I was doing. It actually went easily. As I recall, there's an O-ring where the box fits against the block -- you might want to buy a replacement first. [Response 2:] Try running some Gunk Motor Flush (a kerosene solvent/detergent used just before an oil change) down into the breather box through the flame trap tube. It may dislodge any crud inside the box and free up the drain into the crankcase. Just make sure you change the oil immediately after you do this. [Response: Ivan] To anyone wondering about the legitimacy of the "oil fill cap wiggle test", I can vouch for its validity. On my '86 B230FT, changing all the clogged PCV hoses did not affect the vacuum at the fill cap, but changing the oil trap sure did. The old oil trap weighed about twice as much as the new, and was visibly full of crud. Changing it was pretty easy, even without removing the intake manifold, but do be sure to buy the O-ring that goes with it, and some liquid gasket. The results are well worth the $37: the turbo is no longer blowing oil past its seals (I think), the car idles a little more smoothly, and the oil fill cap stays happily in place at idle.
Finding Engine Oil Leaks. Rear Main Seal. Auto supply stores (larger ones such as NAPA) sell an ~$5 1-2 oz. bottle of oil leak dye. Clean/wipe existing oil from engine etc., add to engine oil, run for 50-100 miles and inspect for leaks with a black light. The "dye" fluoresces brightly when exposed to black light. Buy a fluorescent black light at Walmart; General Electric makes both a BrightStick (24 inches) and a smaller blacklight unit, both AC powered and both inexpensive.
[Look for leaks at:] Regarding oil leaks
on 89 744T: Prime places to look are cam cover, distributor O rings, turbocharger
return line (at turbo and the O ring into the engine) and, like Letterman's
top 10, Number 1: Oil Filter mounting O ring(s).
[Editor's Note:] It helps to have
a clean engine when you are looking for leaks. See below for tips
on cleaning your engine.
Cleaning
Your Engine. [Editor's Note:] It helps to have a clean engine
when you are looking for leaks. Cover the distributor with plastic
wrap. Put a piece of well-chewed chewing gum on top of the little
vent hole on your brake fluid reservoir. Use Simple Green or a water-based
degreaser on stubborn spots, then use the "tire cleaner/degreaser" setting
at your local self-carwash to cover the engine with cleaner. Try not to
spray into the alternator, ABS unit or distributor. Let it soak for
a while, scrubbing with a brush where necessary. Use the low-pressure
wash to remove the deposits. Do this at least once per year
and you will find it much easier to both work on the engine and diagnose
problems.
Removal Cautions:
[What have you used to pull the old seals out and press the new ones in?] It's pretty straightforward as long as you have all the timing marks lined up. Just keep that little detail in mind for re-installing the belt. As far as removing the seals go, I have a little tool in my tool cab that I don't know the origin of that slightly resembles a dental probe. It's a straight, ice pick looking thing with a 90 deg bend at the working end. I simply reach back behind the edge of the seals, work my way around and pry 'em out...being careful not to nick any of the sealing surfaces. [A cautionary tale] I just did a 120K mile service on our '90 745 (B230F). I did the oil seals (and water pump--how's that for anal!) as long as I was doing the timing belt. Two things about that. First, a good impact wrench makes the crankshaft pulley nut a breeze, even with an automatic trans. The crankshaft barely moves, even with nothing holding it in place. Now the bad news. I think I may have slightly scratched the camshaft in pulling the seal. There is oil on the water pump coming from the vicinity of the top, front of the head, on the order of a drop or two per minute. To be sure I didn't screw it up, I redid both valve cover gasket and camshaft seal the next day (cursing all the way). I felt a slight scratch on the shaft with a q-tip the second time, and buffed the cam with fine emery paper and 1200 grit finishing paper. Anyway, it still seems to leak.
Pressing in the New Seal:
Installation is NOT the reverse of removal.
I used my hands to gently but forcefully press the seals in place. Worked
for me... at least they're still holding after 10k miles. [Response: Paul
Grimshaw] There is a special Volvo Tool (PN 9995025-5) that is used
to press the oil seal into place. Is the tool necessary? Well,
the seal is fairly fragile, with an inner spiral spring that can be easily
bent. The seal costs almost as much as the press tool, so I'll let
you decide the cost/benefit. As for tool necessity to install the
seal, if you are careful it can be done without the press.
[Response: Rob Abel] That "special
tool" is just a socket-like contraption that fits over the crank, then
has a bolt which threads to the crank - purpose to evenly, slowly and gently
press in crank seal. You can do the same thing with homemade tubing, pvc,
pipe, or whatever has the proper diameter and two square ends. On the crankshaft,
the tube should fit over the crank, but not be so large as to be larger
than the crank seal. Ideally, the outside diameter should be just smaller
than od of crank seal, and inside diameter just larger than od of crankshaft.
Load the spring into the lips of the seal
with some grease so it won't fall out, lube the lips of the seal,
start it in by hand evenly, then gently
tap it into place using the "seal installer" you've found/made/stolen/borrowed
or whatever, and a wooden block. The cam and auxiliary shaft are the same
diameter, same seal, so you only need 2 installers, one for cam and aux.,
and one for crank seal. Just be patient and go slowly, and you'll get them
in right.
Some prefer to use RTV sealer on the outside
of the seal, others don't. If you do use a sealer, use brake
cleaner to clean up all surfaces first.
[Another tip:] I bought a PVC coupling
that was close to the same size. I used the crankshaft bolt and a piece
of flat iron to press it in. Went in squarely. [Another: John B.]
Use a seal pusher you can make out of copper tubing or pvc tubing...use
a rubber mallet on the pusher to tap the new seals in.
Lubricating the Seal Prior to Installation:
[Fix:] did you lube the sealing lips of the oil seal with engine oil prior to installation? I've learned the hard way; it doesn't take long to maim a dry seal. [Fix:] [See also Cam Seal Replacement] Make sure you put sealant on the sides of the front bearing cap, and on top of the gasket in the same places, also put sealant under the cap on the head mating surface between the bearing and the seal. If the leak is indeed through the seal, you could try moving it in or out a little or get a new seal with two "lips" (no idea what it's called...).I always do exactly as all the books say not to, I remove the front bearing cap and take the old seal out, then I apply oil to the outside of the new one to avoid squeezing it and put it in. Then I apply sealant on the bearing cap, just in front of the bearing surface, and put it back. [Another response:] Two common problems installing seals are rolling over the seal lip, and failing to pre-lube the lip and crank surface. I hope you considered both of these.
Location of New Seal:
[Query:] I'm still at a loss as to how deep to press in the main seal - should it be flush with the housing or jammed all the way in? [Response : Rob Abel] See if you can get a good look at the surface of the crankshaft which was in contact with the lips of the old seal. Sometimes, grit gets in there and causes ridges to wear in the crankshaft. Because of this, many will seat their seals a bit deeper, to offset the lips of the seal from the more abrasive surface of the scratched crankshaft. The idea is to seat the seal so it contacts the crankshaft at a smooth point. Doesn't really matter whether it's flush or all the way in. I would put it just inside of flush if you can, but it depends on the cranks surface. [Another:] If you install the seal about 1/16"-1/8" further in than the old seal, the lip will have a fresh surface on the crank. [Tip from Washington Volvo Club] Care is required when installing front oil sealsDONT push in too far. DON'T get it more than 1/16 to 1/8 in. past flush.
Procedural Tips:
More on Engine Seal Installation. [Query:] I'm doing my timing belt and want to replace the seals. I can't bend, push, force or cajole the new cam and idler seals in place. I've tried everything I can think of. Are there any tricks? The old ones were orange reddish, the new are black and seem slightly larger. [Response 1: Alan C.] Just my 2 cents worth having just gone through this, twice for the intermediate shaft seal. It leaked after installation. When I checked it with a mirror before the second replacement I saw that the lip had rolled out on the bottom causing the leak. Use a mirror and flashlight to be sure the lip is not rolled out. Volvo told me to put white grease in the area that contacts the shaft but nothing on the outside of the seal. They also told me that they redesigned the seals, that is why the new ones are black. Make sure there are no pieces of the old seal in the recess as it would make it hard to press in the new one. I found it helpful to gently slide the seal over the shaft while rotating it to be sure the lip does not roll over. Find/make a press tool from pvc pipe/coupling and use the pulley bolt to press in the seal. Take your time and check the progress to make sure it is going in straight and do not seat it too far in. I do not think it is a good idea to pound in the seal as this might cause the spring on the inside to pop out. Hope this helps. [Response 2: Don Foster] Last time I did a cam seal I pulled the valve cover and removed the front bearing cap, which also retains the seal. Be careful of the valve cover gasket. The I-shaft seal, as I recall, pried out easily, and the new one pressed in -- a tad firmly (which is comforting). Don't forget to clean everything thoroughly, and lube the seal lip and shaft surfaces before you install the seal. Also, examine carefully to be certain you haven't "rolled" the seal lip during installation -- easy to do, easy to miss. [Response 3: Henry Cordova] When my seals leaked after installation, I traced the problem to forgetting to clean the sealing surface on the camshaft before replacing the seal. I was used to Japanese engines which have a positive stop on the seal to ensure it always goes in the same depth. The Volvo seals don't have this stop, so I put it in just a little off from where the old one was. The old location was smooth due to the presence of the old seal. The new location had some build up which ruined the seal in no time. I pulled it apart, cleaned the camshaft with fine emory cloth and replaced the seal. No more leak. [Response 4: Kerry Schutt] Be sure to clean the seating surfaces on the engine real well where the seals go. Most of my time doing the job was spent cleaning those areas. I used small cotton rags and lacquer thinner and kept rubbing until it was all shiney metal. I didn't want any leaks after I was done. [Response 5: Alan Carlo] So now I gently turn the seal onto the shaft when assembling to prevent this. Then check the installation with a mirror and flashlight, all around. Be sure to pre-lube the seal surface where it contacts the shaft before assembly. A Volvo tech told me to use white lithium grease to fill the small recess of the shaft contact area. Also do not hammer the seal in as the jolts can dislodge the spring causing a leak. [Response 6: Dick Riess] Volvo even went so far as to advise a wait of 20 minutes to make certain they were in ok as they can flip the seal lip. I use some Vaseline on my seal lips and use an old seal backwards to tap on to insert new seal. Dont drive new seal all the way in either. Would clean the crank surface with some of that 3M Scotchbrite of or a strip of fine emory papers like they use to polish cranks. [Editors note: use the less abrasive Scotchbrite blue]. [Response 7: Ivan K] To prevent the seal spring from getting out of position during installation, pack the area around it with grease. [Response 8:] When punting the cam oil seal, I always put a bit of red RTV/Permatex on these seals between the cylinder head and bearing cap for insurance... [Editor's Note: See Cam Seal Replacement] Also use sealant on the valve cover gasket, where it has a sharp bend around the front bearing cap.
[Technical Tip from Volvo TSB 21121 Oct 93] New seal designs are now used for camshaft and intermediate shafts starting in Oct 93. The seals (p/n 6842273-2) are more compact and use a special version of the seal installation tool p/n 9995025. Lubricate the seal and press it onto the shaft using the tool. To ensure that it sits correctly, it must be pressed in for at least 30 seconds. If pressed for a shorter period, it may creep back out. Remove the tool carefully to avoid damage to the seal lip or spring.
Crank Seal Leaks After Installation.
[Problem:] I could kick myself! I just
checked my front main crank seal I replaced a week ago! After running the
car for a short bit, I noticed leakage at the bottom of the crank housing!
Ahhhhgg! I know when I put the seal in it was flush to the housing and
felt even all the way around! I have heard you should seat them deeper
when replacing one - but it looked good and I did not have the proper seal
tool to do the job, plus I afraid to seat it to deep and get a leak that
way. I used a giant 3/4 socket to seat it in the past. But this time I
didn't have it around! I bet I didn't seat it far enough or messed up the
spring! [Suggestions:] If it leaks after installation, you probably flipped
your seal lip; I have done it more than once. [More:] Something I did on
mine when I replaced it was coat it thoroughly with petroleum jelly. I
had been warned that the seal can be messed up by installing it "dry".
Also, are you sure it's straight? If it is cocked at an angle, it will
leak. Also, You may have popped out the spring! If you pounded the seal
the spring can pop out. Check it! If you didn't buy an original seal, check
the rotation mark. They make seals for both rotation directions. [Eventual
solution:] Spring had popped out.
Leaking Rear Seal and Replacement Tips. [Query:] I had my Volvo to the dealer today. They told me that there is a slight leak in the rear main oil seal and that it would cost between $700 and $1000 to fix. I only plan on having the car another year or so. Is it really necessary to have this fixed? I never noticed any oil leak and I'm not losing more than .2 qt oil between oil changes (3000 miles.) Is it okay just to keep an eye on the oil level and then fix if absolutely needed?
Diagnostics: Check Flame Trap Function.
[Response: Gene Stevens] Before
replacing the rear seal, have you made absolutely sure that the crankcase
vent system isn't plugged? The N/A engine uses a flame trap (which doesn't
belong on the Turbo, but that doesn't stop some guys from installing one
anyway) and when it gets blocked causes excessive crankcase pressure, pushing
oil out wherever it wants to go. I've heard of new replacements seals
being pushed out of the bore from the same pressure that caused the old
one to leak. Curing the pressure may slow or stop the leak.
[Response: Ted] If the seal is seeping
keep close tabs on it. Make sure that the flame trap is clear and working
properly. If the seal is leaking because of wear this will not be a factor,
but if it is leaking because of crankcase pressure the excess pressure
can actually push the seal right out of the back of the engine, creating
a large leak.
Replacement Tips
[Response: John Sargent ] The reason
it is so expensive to replace the rear main seal is that the transmission
must be removed to access the rear of the crankshaft. To fix it yourself,
you pull the transmission and clutch/pressure plate assembly or the respective
auto transmission parts. The rear main seal is pressed into a seal housing.
You remove this and press in a new seal. Then you reinstall the seal housing
with a new gasket. The seal and gasket are less than $20. When you reinstall
the seal over the crankshaft flange, you have to be sure that you don't
push one edge of the seal lip over. [Response: Randy] I'm assuming
you have a transmission jack. I purchased an inexpensive one from Harbor
Freight because several people here at the BrickBoard advised me NOT to
try to use a floor jack. It was good advice. It really takes some shaking
and push/pulling to remove and install the transmission. My experience
is with the 240 but you'll have the same type of situation with the 740.
On the 240's it is a very tight fit between the transmission and the sheetmetal
in the area of the starter.
While you have it out it is a good time
to replace the front seal on the transmission (readily accessable once
removed) as well as the rear seal and output shaft bushing if the bushing
hasn't been replaced yet (you'll need the gasket between the transmission
and the rear housing if you replace the bushing). There are various other
seals on the transmission that can be replaced at this time- look for fluid
leaks.
The transmission cooling lines may not
come off as you plan (rust and corrosion) and you may need to cut those
lines to remove the transmission. You can use a high quality hose and clamps
to save the cost of purchasing new lines.
Clean up the crankshaft with carb cleaner
of something similiar to remove any build up before installing the new
mainseal. I packed the back of mine with grease and liberally greased the
crankshaft. Don't try to start it straight on when installing on the crank
or you might cause the lip of the seal to push out and the spring might
come out of place. It would be a bummer to have a brand new rear seal not
do its job because the spring was dislodged.
Damaged
Cam Gear While Changing Seal. [Problem:] While removing the camshaft
sprocket (for a seal replacement) I put several small nicks in its teeth.
I used a chain vise-grip with grippy rubber stuff in-between the sprocket
and the chain. The chain cut through the rubber, hence the nicked sprocket.
[Diagnosis:] Why why why did you do that
(sorry)? I always used to use a 17mm box wrench, tap the end with a hammer,
and depend on the timing belt to hold the gear still. This slowly turns
the motor over, but no problem, just move the wrench again. Or, you can
use regular vise-grips to grab the non-rubbing part of the camshaft through
cloth. You can try to find a used sprocket at a wrecking yard.
[Response 2: Paul Grimshaw] To remove
the cam gear (to install the seal on the camshaft), you will need another
special tool called a counter-hold. In addition, the timing belt
tensioner makes refitting difficult [while the timing belt is in place.]
The last thing that you would want to do is wedge the cam gear back onto
the cam as you run the risk of damaging the flange. [Response 2: Zippy]
Slack off the tensioner.